O3A Chorus
Host Support
| Host Type | Support |
|---|---|
| AAX | Yes |
| VST2 | Yes |
Audio
| Channels | Content | |
|---|---|---|
| Input | 16 | O3A |
| Output | 16 | O3A |
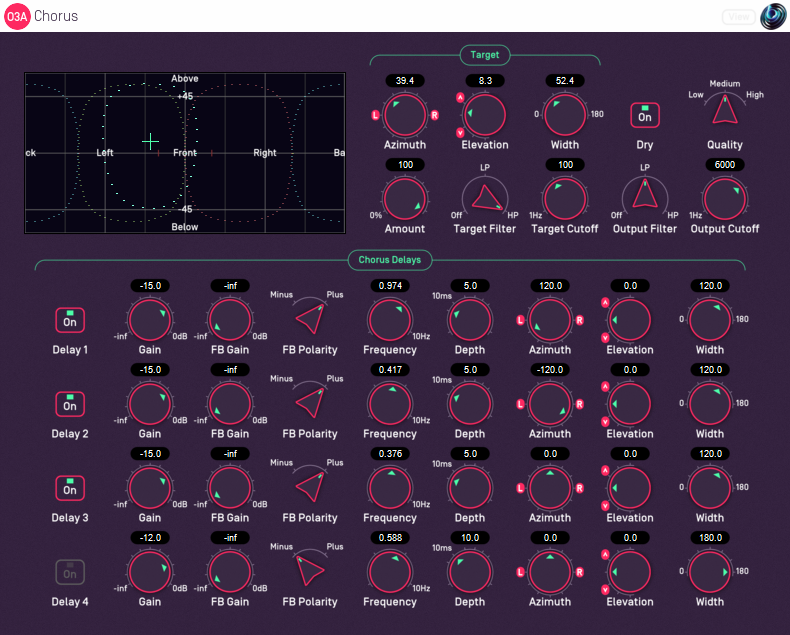
Controls
- Target Azimuth
- Target Elevation
- Target Width
- Target Amount
- Target Filter
- Target Cutoff
- Dry On/Off
- Quality
- Output Filter
- Output Cutoff
- On/Off 1 - 4
- Gain 1 - 4
- Feedback Gain 1 - 4
- Feedback Polarity 1 - 4
- Frequency 1 - 4
- Depth 1 - 4
- Azimuth 1 - 4
- Elevation 1 - 4
- Width 1 - 4
Description
This plugin applies a chorus effect to a target region in a 3D O3A mix.
The centre of the chorused region is selected using azimuth and elevation controls, or the control surface, where the target direction is indicated by crosshairs.
There are labels on the control surface to help you find left, right, above etc. However, if this still does not make any sense, you might want to see our page on the O3A Visualiser which lays out its viewing region in the same way.
Delay Lines
The processed output from the chorus includes a direct, dry audio path and up to four delay lines. Each of these delay lines presents the same audio, but with an independent time-varying delay. The idea is that the combination of these various audio paths results in a thicker sound, as if multiple instruments or voices were present. Other effects are possible too.
The output of each delay line can be focussed on a particular spatial region using independent azimuth, elevation and width controls.
Each delay line has a sinusoidal Low Frequency Oscillator (LFO). The delay is shifted in time so the dry path always arrived first. The dry path is essentially not delayed.
Note that the delay lines here are each carrying a complete O3A scene, not just a mono signal as in conventional choruses.
Feedback and Flange
Each delay line can use feedback to create more extreme effects. It is commonly used in 'Flange' effects.
Feedback gains close to 0dB add a decay to the ends of sounds and stronger timbral colouration. Be careful not to put the feedback gain too close to 0dB as this can result in uncontrolled high volumes.
Target and Output Filters
A 'target' filter on the input determines what frequency range will be affected by the chorus, constraining the target region in the frequency domain as well as the spatial domain. The processed output of the chorus can also be modified by an output filter.
The plugin is available in the O3A Music plugin library.
View Support
When used with O3A View Sync from the O3A View library, this plugin can be connected to the separate View or ViewVR applications.
When this option is available, a 'View' button appears at the top right of the plugin's user interface.
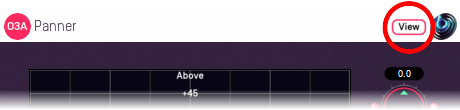
When this is pressed, the plugin is connected to the View or ViewVR application and is displayed there.
| View Support | ViewVR Support |
|---|---|
The current direction is shown using a cross. Hold the left mouse button to set the azimuth and elevation. | The current direction is shown using a beam and cross. Hold a VR controller trigger to set the azimuth and elevation. |
Controls
Controls: Target Azimuth and Target Elevation
The target azimuth and elevation controls determine the direction of the spatial region to be affected by the chorus.
Azimuth is the horizontal angle, between -180 to +180 degrees, measured anticlockwise (left) from the front. Elevation is a vertical angle between -90 and +90 degrees, measured with positive upwards and 0 on the horizontal.
For instance, the direction for azimuth +90 and elevation +45 can be found by turning 90 degrees to the left and then looking up by 45 degrees.
These controls have no effect when Target Width is set to 180.
Control: Target Width
Target Width is an angle, between 0 and 180 degrees, indicating how wide the region to be chorused should be. An angle of 0 indicates a narrow beam and an angle of 180 encompasses the whole scene.
Angles are measured from the target direction to the sound direction. When the angle is less than the width setting, the sound is in the chorused region. In practice, the transition into the target region is a gradual slope rather than a hard transition.
Control: Target Amount
This controls the amount of processed audio that appears in the output, as opposed to unprocessed audio. It applies only to audio in the target region, as other audio is unprocessed anyway.
It works as a percentage, so 0% indicates that no processed audio should be in the output, and 100% indicates that all processed audio should be output.
For many purposes this can be thought of as a Dry/Wet control.
Controls: Target Cutoff and Target Filter
An filter determines what frequencies are processed by the plugin. Others pass through the plugin largely unaffected.
The filter can be configured as a low-pass or high-pass filter, or disabled. The filter cutoff controls the filter's -6dB point.
Control: Dry On/Off
The processed chorus output normally includes the unmodified input ("dry") signal that is provided to it. This switch can be used to silence it. This has various uses, for instance when configuring the chorus, or using it as a "send" effect, or for less subtle effects.
Note that this switch modifies the processed output, and so applies only in the target region (and frequencies). Audio that is not in this region will be passed through unprocessed anyway.
Control: Quality
The plugin uses upsampling. The quality setting determines the degree and quality of upsampling used.
Higher quality settings create substantially more CPU load, but reduce frequency aliasing effects. Low Quality disables upsampling.
Controls: Output Cutoff and Output Filter
An output filter is applied to the target signal path. It does not affect audio that is not in the target region.
The filter can be configured as a low-pass or high-pass filter, or disabled. The filter cutoff controls the filter's -6dB point.
Controls: On/Off 1 - 4
These four controls switch the output of each individual delay line on or off.
Controls: Gain 1 - 4
These four controls control the level of output of each individual delay line. A gain of 0dB will produce an output at the same level as the dry signal.
Controls: Feedback Gain 1 - 4
These four controls control the level of feedback in each delay line. Setting this to -inf turns feedback off.
Using feedback tends to strengthen flange-type settings and can give the effect more of a "tail" which decays after the original sound has finished.
Be careful with this control; setting it close to 0dB can result in high volume output.
Controls: Feedback Polarity 1 - 4
These four controls can be used to switch the polarity of the feedback gains. This does not affect the output gains.
Negative values tend to produce more pronounced effects, and can help control build up of low frequencies.
Controls: Frequency 1 - 4
These four controls set the frequency (in Hertz) of the sinusoidal Low Frequency Oscillator (LFO) used by each delay line.
Controls: Depth 1 - 4
These four controls set the depth (in milliseconds) used when calculating the delay of the sinusoidal Low Frequency Oscillator (LFO) used by each delay line. The resulting delay time oscillates between zero and this value.
Controls: Azimuth 1 - 4, Elevation 1 - 4 and Width 1 - 4
These four sets of controls determine the spatial region which is affected by a each delay line. The controls work essentially in the same way as the overall target controls (Target Azimuth etc.), but only one delay line is affected by each.
These can be used to increase the spatial complexity of the resulting audio scene. If the delay line should affect the whole scene, set the width to 180.
Presets
Presets are available for this plugin:
- Gentle
- Thin
- Thick
- Fast
- Flange
- Multiflange
- Edginess
- Modulation
- Spin
- Swirl