O3A Shoebox
Host Support
| Host Type | Support |
|---|---|
| AAX | Yes |
| VST2 | Yes |
Audio
| Channels | Content | |
|---|---|---|
| Input | 1 | Mono |
| Output | 16 | O3A |
Controls
- Source B/F
- Source L/R
- Source D/U
- Listener B/F
- Listener L/R
- Listener D/U
- Pace
- Source Size
- Source Edge
- Gain Rolloff
- HF Rolloff
- Echo Depth
- Echo Gain
- Wall Back
- Wall Down
- Wall Front
- Wall Left
- Wall Right
- Wall Up
- Gain Back
- Gain Down
- Gain Front
- Gain Left
- Gain Right
- Gain Up
- HF Back
- HF Down
- HF Front
- HF Left
- HF Right
- HF Up
Description
This plugin produces an acoustic simulation of a rectangular "shoebox" room in which a single (mono) sound "source" is playing and a front-facing "listener" is listening. The room has six surfaces, which we call walls, although the upper and lower walls would more normally be known as the ceiling and floor. The distance of the walls from a central "origin" can be changed.
The simulation calculates a number of paths from the source to the listener. The first, or "direct" path is a straight line between the source and the listener. Other paths are found by simulating reflections of the sound off the walls of the room until the listener is reached.
In principle, an infinite number of (increasingly quiet) reflections are needed for a strict simulation. In practice, an Echo Depth control limits the number of reflections that are simulated. You may wish to replace missing later reflections using a less precise reverb such as the MS5.
All paths (including the direct path) are modified to take into account distance attenuation (see Gain Rolloff) and high frequency air absorption (see HF Rolloff).
All paths are also delayed, taking into account the speed of sound. When the distance between the sound and listener is changing, this results in a simulation of Doppler shift, which is typically heard as a change of pitch that depends on speed.
When sounds are reflected off walls, absorption is modelled using wall-dependent gains and high frequency gains. These allow control of the "character" of the wall surfaces.
A range of preset programs are available for this plugin. In Reaper, these appear on the main drop-down menu immediately above the main plugin screen area.
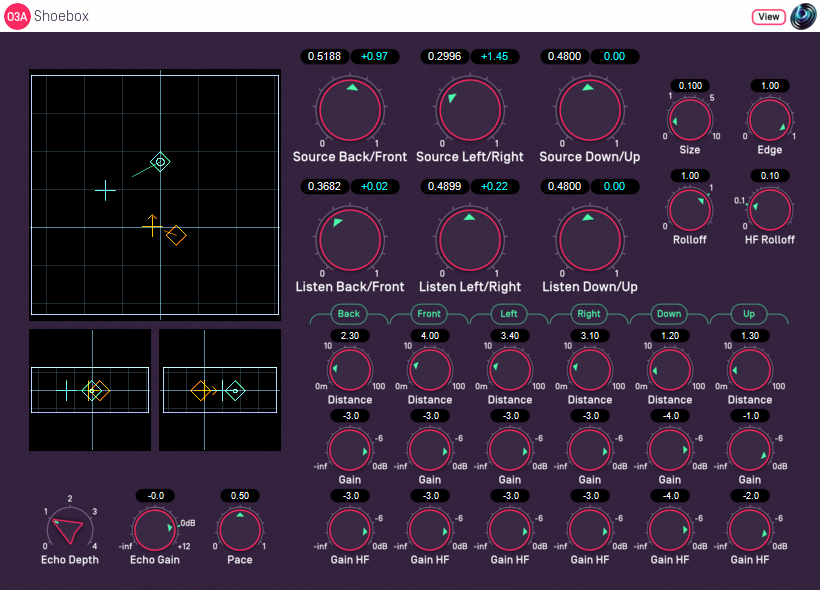
The Control Surfaces
There are three control surfaces on the left side of the plugin, which can be used to move the source or listener. The larger surface is a view from above, so the front wall of the room is at the top and the left wall is on the left. The other two are views of the same scene from behind (so the ceiling is at the top and the left wall is on the left) and from the right (so the ceiling is at the top and the back wall is on the left). These views may be familiar from the O3A Panner LS and O3A Zoom plugins from the O3A Manipulators library.
The control surfaces show an outline of the room shape, with a grid. The outline changes to be proportional to the actual room dimensions.
The source is shown on the control surfaces in green/blue and the listener in orange. Left-clicking or left-dragging on the surfaces changes the "target" location of the source and the source will start moving towards this location at a speed that depends on how far away the target is and the current Pace setting. This means you can drag the source around on a control surface in a way which gives reasonable control of speed (and thus Doppler).
This listener can be moved in much the same way, but by right-clicking. If you do not have a right mouse button, you can hold down the "Alt" key on your keyboard and left-click instead.
Warning: CPU Load
This plugin can create a large CPU load, so be careful. When choosing the balance between performance and audio quality, we have chosen quality in several places where we could have used cheaper but less precise algorithms. The difference in quality is most obvious when the source or listener is moving. The plugin has been tuned to run fast, but it simply has a lot of processing to do.
And it gets worse. Because this plugin calculates the acoustic reflections of a source, you generally need to run a separate copy of the plugin for each different source location. For instance, this means that if four sounds are playing then you will typically need to run four copies of the plugin. This is different to how plugins such as the MS5 reverb work - these can be applied to the whole scene at once, rather that separately for each sound in the scene.
You may want to do a little planning before starting to use this plugin, to make sure you are going to have enough CPU power for your project.
The Echo Depth control has the largest impact on CPU load and high settings can become very expensive very quickly. Because the human brain seems to pay the most attention to the earliest reflections, a good compromise is typically to generate just the first few reflections using this plugin (using an echo depth of 1 or 2) and then to send everything to a single shared MS3, MS5 or convolution reverb to generate late reflections.
Wet/Dry Mix
In general, mixing dry signal with the output of this plugin (for instance with Reaper's Wet/Dry dial) is a Bad Idea. This is because the direct path signal produced by this plugin (which is the most similar to a 'dry' signal) is delayed, so combining it with a dry signal may result in phasing.
If you need a quick and dirty way to change the direct/reflected balance, the Echo Gain control can be used.
Listener Orientation
This plugin assumes that the listener is pointing forwards. If this is not what you want, you can modify the output of this plugin using the O3A Rotation or O3A Look plugins. You can mix the output of several shoebox models together before applying this modification.
The plugin is available in the O3A Reverb plugin library.
View Support
When used with O3A View Sync from the O3A View library, this plugin can be connected to the separate View or ViewVR applications.
When this option is available, a 'View' button appears at the top right of the plugin's user interface.
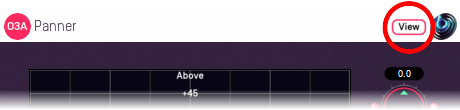
When this is pressed, the plugin is connected to the View or ViewVR application and is displayed there.
| View Support | ViewVR Support |
|---|---|
The current source direction, relative to the listener, is shown using a cross. Hold the left mouse button to set the source location. | The current source (green/blue) and listener (orange) locations are shown as locations in a scaled box, scaled using the plugin wall dimensions. Source and listener target locations are shown as 3D crosses and current locations are shown as spheres (current location movement is determined by the current Pace setting). The source location relative to the listener is also shown in its unscaled actual location. One VR controller moves the source (green/blue) and one moves the listener (orange) and they have coloured indicators to show which is which. Hold a VR controller trigger to move a scaled location to the controller. |
Controls
Controls: Source B/F, Source D/U and Source L/R
These three controls determine where the sound source should be within the room. A scale from 0 to 1 is used for each control, which is shown in white above the dial.
| Label | Meaning | Value 0 | Value 1 |
|---|---|---|---|
| Source B/F | Move the source to the back or front | On the back wall | On the front wall |
| Source L/R | Move the source to the left or right | On the left wall | On the right wall |
| Source D/U | Move the source down or up | On the floor | On the ceiling |
An equivalent value in metres (relative to a central "origin" point) is available in blue above the dials. However, these values are not available directly through automation. Automation uses the values shown in white.
This location is also shown on the control surfaces on the left, in green/blue. It can be changed by left-clicking. Note that the source does not jump immediately to this location when it is changed. Instead, the source is pulled towards it. This allows control of the speed the sound is moving, which is important for realistic Doppler. (Also see the Pace control.)
Controls: Listener B/F, Listener D/U and Listener L/R
These three controls determine where the listener should be within the room. A scale from 0 to 1 is used for each control, which is shown in white above the dial.
| Label | Meaning | Value 0 | Value 1 |
|---|---|---|---|
| Listener B/F | Move the listener to the back or front | On the back wall | On the front wall |
| Listener L/R | Move the listener to the left or right | On the left wall | On the right wall |
| Listener D/U | Move the listener down or up | On the floor | On the ceiling |
An equivalent value in metres (relative to a central "origin" point) is available in blue above the dials. However, these values are not available directly through automation. Automation uses the values shown in white.
This location is also shown on the control surfaces on the left, in orange, along with arrow heads to show the direction in which the listener is pointing. The location can be changed by right-clicking. Note that the listener does not jump immediately to this location when it is changed. Instead, the listener is pulled towards it. This allows control of the speed the listener is moving, which is important for realistic Doppler. (Also see the Pace control.)
Control: Pace
When the source or listener location is set, the control surface shows the target location using a cross shape and the source or listener will start to move towards the target. On the way to the target, the current location is shown using a diamond and the direction and speed of movement is shown using a line.
Changing the pace changes how quickly the source or listener moves towards the target. By changing this and dragging the source or listener around the control surface it is possible to simulate different speeds of movement.
Values are between 0 and 1, where a value of 0 makes the source or listener move slowly and 1 quickly.
Control: Source Size
Source size can be used to give a source a volume. When the source is close, this changes the spatial response of the source (you will see it looks bigger in the O3A Visualiser). This effect continues when the listener travels inside the source.
When the listener is inside the source, there is a substantial omnidirectional component to the soundfield generated here. You may wish to make this more diffuse, for instance by using the O3A Diffuser plugin.
The source size is indicated in the control surfaces using a dark green/blue circle around the source's centre.
Control: Source Edge
The edge setting further determines the shape of a source with size. Increasing the edge setting introduces tapering from the edge of the source, effectively moving more of it towards its centre. This changes the spatial response of the source, particularly when it is close.
The source size is indicated in the control surfaces using a light green/blue circle around the source's centre.
Control: Gain Rolloff
This rolloff determines the rule that is used to reduce the source's level as the source moves away. A value of 1 is closest to how this occurs in reality. Reducing the value reduces the effect of the level drop and increasing the value exaggerates it. A value of 0 means that the level stays constant.
Mathematically, the gain applied is determined by the inverse square law, but raised to a power given by this control.
Control: HF Rolloff
This controls a simple low-pass filter that reduces high frequency content as the source moves away. This happens in reality due to air absorption. A value of 0.1 is close to reality at typical pressure, temperature and humidity, and changing this value reduces or increases the effect. A value of 0 means that no filtering occurs.
The value used with this control is the number of additional decibels lost at 10kHz for each metre of distance, on top of the main Gain Rolloff effect.
The low-pass filter used is further modified to take into account high-frequency absorption during wall reflection.
Control: Echo Depth
The echo depth is the number of times the sound is bounced off walls (between 0 and 4). Because of the number of walls involved, increasing the depth massively increases the number of audio paths considered. This allows greater realism, but also increases the CPU load. Load is roughly proportional to the number of paths.
| Depth | Audio Paths |
|---|---|
| 0 | 1 |
| 1 | 7 |
| 2 | 25 |
| 3 | 63 |
| 4 | 129 |
Control: Echo Gain
This gain (between -60dB and +12dB) affects all reflected audio paths (i.e. everything except the direct path). It can be used to make quick and dirty changes to the reverb balance, for instance to check how the direct sound on its own compares to the overall plugin output. Generally we recommend this be left at 0dB.
Controls: Wall Back, Wall Down, Wall Front, Wall Left, Wall Right and Wall Up
These values indicate how far away each of the six walls are from a central "origin" point. When these values are changed, the room layout and grids on the control surface are updated.
Distances are in metres, between 0 and 100.
Controls: Gain Back, Gain Down, Gain Front, Gain Left, Gain Right and Gain Up
These gains control how much sound is absorbed (or lost) when a sound is reflected off each wall.
Setting this to 0dB means that no sound is lost in this way. (Reflected sound will still be quieter because of the longer distance travelled.)
Setting this to "-inf" means that no sound will be reflected from the wall at all, which can be particularly relevant in outdoor simulations.
Controls: HF Back, HF Down, HF Front, HF Left, HF Right and HF Up
These gains control how much sound is absorbed (or lost) at high frequencies when a sound is reflected off each wall.
Setting this to 0dB means that no sound is lost in this way. (Reflected sound will still be quieter because of the longer distance travelled.)
Note that this effect is cumulative with the main gains (Gain Back etc.) above. By using one or the other, or both, different surfaces can be simulated.
Presets
Presets are available for this plugin:
- Small Room
- Medium Room
- Large Room
- Soft Hall
- Hard Hall
- Park
- Valley
- Jungle
- Desert
- Cupboard
- Echoes
- Dry